Your hairstyle sets the pitch for everyday beauty. So
we decided to share easy and quick examples of hairstyles for every day with
you.
But first we would like to say, what the requirements
for the everyday hair are:
1. It must look pretty.
2. The hairstyle must be simple, and not
time-consuming.
3.Your hair must be clean and neat!
4. A simple hairstyle should be created simply,
without the help of hair stylers. To create a simple smart hairstyle you will
need only a comb, hairpin / ponio and a hair spray.
Going to school or a university, we always want to
look stylish. However, it is always necessary to take into account the
requirements of the educational institution, which are often opposed to the
excessively frivolous appearance.
In addition, meditating each morning over what to do
with your hair today and, especially, to spend a lot of time on the creation of
hairstyle is a time-consuming process! There is always a way out!
We suggest you a few options of the hairstyles that
may be suitable for studies and work!
Girls from LuxyHair channel on Youtube will tell you how to create stylish
hairstyle in detail, suitable for school, university or work. And here we
suggest you to look at the photos of the most popular hairstyles that will not
take too much of your time! Every student wants to save their time that is why
they try to buy essay fast, to eat junk food
etc. So, here we present ou with the most common students’ hairstyles.
Women love to be trendsetters. And when it comes to matters of the mane, you do love to stay ahead of the hair envy curve; be it in the type of haircut you have, the coloring techniques or the way you style your hair. But it’s not always possible to spend hours in hair styling when you are on the move or when you’re late to school, work or an appointment. So we bring you quick outdoorsy hairstyles that you can perfect in a matter of minutes, perfect for women on the go –
Tired of wearing your hair down? With nothing more than your tail comb, rubber bands and a donut bun shaped accessory, here’s a very simple hairstyle that you could do in minutes and yet look professional and elegant. It’s perfect for everyday wear or for a night out or even business meetings.
§Start by pulling all your hair together on the back and use your tail comb to comb and neaten it out completely.
§Pull all hair together and secure it with a rubber band making a high ponytail.
§Put in the donut bun into the hair and cover the bun with hair by spreading it evenly around the donut bun. Use another rubber band to secure it.
§Take the remainder of the hair and twirl it around your bun securing it neatly with a U-pin.
Here’s an easy video demonstration of the hairstyle for easy understanding.
You can also try different variations to these versatile buns by adding accessories, putting bows, hair bands, flowers, or jewelry to have more fun and to sport a different style every time.
Side part hairstyle
This is a really simple hairstyle and can be accomplished in a jiffy as this doesn’t take any over the top styling. Simply part your hair on the side and bring all your hair to one side over your shoulder. Brush it well with a paddle brush and secure the sides the other side with a bobby pin so the hair doesn’t move off to your back. This look can be perfected with a slight curling to provide that soft, loose wavy look. Do inner curling to bring nice waves onto the face.
Watch this video for a practical understanding of how it’s done.
Side parting is also a versatile styling and is great for any type of hair, short or long and sleek hair. You can show variations by keeping your tresses straight, curly, subtle waves, long waves, with bangs, color highlights or streaks for a slick and sassy finish. Wearing your hair in glossy, gorgeous curls parted to the side adds to your complete style, the waves providing volume and dimension providing you with the red hot red carpet look for a great many occasions: wedding receptions, vacations, office parties or a date!
Braided Hairstyles
Braids are styles that never go out of fashion. It’s not an easy hairstyle to perfect but with a little precision and practice you will find yourself with a cute hairstyle. Braids are absolutely stunning, be it a fish tail braid, a three legged braid, messy braids or the French style and also one of the best styles to experiment with, a lot, especially when you do not have that extra five minutes I the morning to spare. No one will ever guess how simple it was to make, they are low maintenance and you’ll find yourself with a quirky and chic style.
§Let’s show you how to do a fishtail braid in a matter of minutes using rubber bands. Follow this step by step procedure and you’ll master the hairstyle in no time.
§Comb your hair and do a side parting.
§Now divide the hair into two sections. Now make a sub section for each of the two sections and bring it in to the other mains section. Keep repeating this until you reach end of the hair.
§You basically need to keep braiding multiple strands using these sections.
§Once you reach the end and secure your hair with rubber bands.
§If you feel the braid is looking too thin, you can pull it sideways and loosen it to give a voluminous look.
Hairstyles amplify your overall style quotient and give your hair a fresh look every day. If you are also bored of flaunting plain jane hair and looking for quick hairstyles that look awesome but don’t take too long to make, this is the ultimate guide for you. So try out these stylish hairdos and up your summer fashion game.
Straightening Hair is no longer a time-consuming and
expensive process, thanks to amazing flat irons such as this Babyliss Pro Nano
Titanium Iron. Here’s a product that is efficient, durable and extremely budget
friendly. Discussed below and is strongly recommended to straighten your hair
nicely.
This unique straightener works as a curler as well. A curling
iron can also be bought for curls, but the shape that a straightener gives is
much better as compared to the curler. This straightener is recommended for
tighter curlers because it’s around one inch and the thickness of the
straightener decides how big the curls will be.
Thin body determines
the shape of curls
Its plate size is around 1-inch built but in looks, they are
much thinner. Its outer body consists of
thin titanium plates that have a smaller size. It
offers little lovely curls
and every easy to operate and get curls that shall make everyone else jealous.
Titanium plates
As compared to other straightening rods, its body is a little
bit different because its plates are built using titanium. Also, the plates are
not covered with any other nonmetallic covering. There is a vast difference
between metal and ceramic plates.
Longer plates are there
for more coverage
A good thing about this product is that the length of the
plate is about 5 inches and its much more as compared to the standard size of
the plates. Hair can be grabbed quickly in one single go. Different sizes of
irons are available in the market, i.e. about 1-1.5 inch. For a good curl
select the 1 inch and if the length of your hair is long, a 1.5-inch size
should be good enough.
Tons of Heat Settings
and Incredibly high max temperature
The heat setting temperature is up to 450 degrees, and that
makes it so fast in its working. There are a ton of flat irons that get hot
quick, but if we talk about sensitivity and heat application, the Babyliss Nano
Titanium is one of the best products that treats hair with outstanding care.
Ionic not Ironic
Since this straightener is titanium coated, it is likely to
release the negative ions that help to lock the moisture into the hair. This
quality will prevent hair from getting dull and damaged.
Drawbacks
One of the only drawbacks of this Babyliss Nano Titanium Iron
is that it stays on until shut off manually. Unlike more sophisticated models
that have built-in timers and sensors that detect when the iron is not in use
and switch off automatically, this flat iron requires the user to turn it off
after finishing. However, considering all the great features that this flat
iron offers, the lack of this feature barely figures in as a drawback.
Quick Recap of the best
features:
• Smooth titanium
plates conduct ultra-high heat and resist corrosion
• Slim design and ultra-lightweight
for maximum comfort
Customer Reviews
The Babyliss Pro Nano Titanium Straightening Iron has
received much attention from the online shopping community. It has been awarded
an impressive 4 out of 5 stars on Amazon and has received a great 1318 customer
reviews. The majority of the reviews are positive, and most clients feel that
this iron is amazing for straightening as well as curling hair.
Conclusion
It’s very hard to decide between titanium and ceramic plates.
Most of the professional hair experts recommend titanium because they provide
ultra temperature settings and fast heating features. Couple these settings
with the sleek body and shape of this product and you have one of the best
irons on the market.
Author Bio: Hi guys, My name is
Miranda, and I am a professional hairstylist based in New York. I have been in
the fashion industry for the past 10 years and have been graced to work with
the some of the top ranking professionals in the field. This year marks
my 10th anniversary as a professional stylist, and I’m looking to make it count
and share all that I have learnt.
1SLEEK, LOW BUN A strong center
part and tons of shine spray make a low chignon instantly classic (add smoky
eyes and it’s ridiculously sexy, too). To get this pretty loop, draw a center
part and clip aside a one-inch chunk of hair from each side of the hairline.
Gather the rest in a low ponytail at the nape and roll (rather than twist) it
up toward the base, pinning it against the head. Then pull each of the front
pieces back around the loop, pinning them into place. Finish with a generous
dose of glossy shine spray, like Moroccanoil Glimmer Shine Spray.
SLEEK, LOW BUN
2. BOUNCY PONYTAIL
The last person to
create a ponytail this perfect was a toy designer at Mattel. To get the effect
in real life, hairstylist Owen Gould misted Sachajuan Ocean Mist salt spray
through Chrissy Teigen’s damp hair, rough-dried it, and then curled her entire
head with a one-and-a-half-inch curling iron. He sprinkled volumizing powder
(we like Redken Powder Grip 03 Mattifying Hair Powder)
through her roots and back-combed them, then pulled all her hair into a
ponytail at the back of the head. To get the lifted tail, grab each side of the
ponytail and pull them apart to tighten the elastic, then tease the
underlayers.
BOUNCY PONYTAIL
3. WAVY PONYTAIL
This barely there
ponytail is sexy and sporty at once. Work a palmful of mousse (Karolina
Kurkova’s stylist Bryce Scarlett used Leonor Greyl Mousse Au Lotus Volumatrice)
through damp hair and blow-dry it smooth with a medium round boar-bristle
brush. Roll each section up to the head and secure it in place with a metal
duckbill clip until the entire head is set. Wait 20 minutes, unclip the hair,
then slip a clear elastic loosely around the tail below the nape. Don’t double
up the elastic—if it looks like it’s going to fall out, you did it right.
WAVY PONYTAIL
4. TOUSLED TOPKNOT
The topknot of 2015 is cool, textured,
and not even close to prissy. To get it, work mousse through damp hair and
really rough-dry it, embracing whatever gorgeous natural texture you’ve got.
Once dry, use your fingers (not a brush) to sweep the hair up to the crown, tie
it in a ponytail with an elastic, then loosely rope it around the base and
secure it in place with bobby pins. Massage your hairline with your fingers to
loosen some pieces for an effortless finish.
TOUSLED TOPKNOT
5. WOVEN BRAID
This style requires one
thing and one thing only: a kickass (and preferably very long) scarf. Place it
a half-inch back from your hairline and tie it securely at your nape. Divide
all your hair into three sections (two small outer sections and one large center
section). Put the ends of the scarf in the outside sections, then braid all the
hair together very tightly until you reach the ends. Double-knot the scarf and
you’re out the door.
WOVEN BRAID
6. SLICKED BACK
This is hands down
the easiest, neatest way to pull back your hair (and deal with growing-out
bangs). Grab a chunk of hair from the front of your hairline—about
one inch deep and as wide as space between your eyebrow arches. Mist it with
hair spray, then brush it straight back as far as it will go. Secure it with a
clear elastic (if it’s past the crown) or a Goody Jenna Metal Domed Barrette.
Flatiron the loose sides of your hair for a smooth finish and mist with shine
spray (like Garnier Fructis Style Sleek & Shine 5-in-1 Serum
Spray) if necessary.
SLICKED BACK
7. MODERN FRENCH TWIST
Tousled, imperfect,
and a little lopsided, this is how cool girls wear French twists. “The
messiness makes it sexy, not fussy,” says hairstylist Orlando Pita. To get
the rough texture, mist dry shampoo (like Batiste Dry Shampoo Original) from
roots to midlength, then spray your hands with hair spray (like L’Oréal Paris Elnett Satin Hairspray)
to create finger grooves as you gather it at the nape. Slowly twist the hair up
the head, and secure it by sliding long, U-shaped pins into the seam. Tuck any
loose pieces down into the roll and finish with another layer of hair spray.
MODERN FRENCH TWIST
8. VOLUME-BOOSTING BANGS
Bangsare an immediate way
to add fullness to flat, fine hair (and, no, not in an ’80s way). Ask your
stylist for Karlie Kloss’s brow-skimming, side-swept ones. “But don’t cut
too far into the temples or your hair starts to look thin,” says
hairstylist Mara Roszak.
VOLUME-BOOSTING BANGS
9. OMBRÉ HIGHLIGHTS
Ombré hair shouldn’t look like a
black-and-yellow Rothko painting. Instead, ask your colorist for highlights
that are just barely lighter than your natural hue, working them into the ends
and in random sections throughout (rather than perfectly spaced ones). Leave
the roots untouched, and you won’t have to touch up your color for up to six
months.
OMBRÉ HIGHLIGHTS
10. RUMPLED WAVES“This started
as a backlash against the professional blowout,” says hairstylist Chris
McMillan. “Smooth hair looks high maintenance.” For easy waves like
these, spray volumizer (like Phyto Phytovolume Actif Volumizer Spray)
through damp hair and blow-dry your hair upside down. Once your hair is 75
percent dry, part it in the middle and twist it into two low pigtail buns,
leaving the ends out so they stay straight. Aim the blow-dryer at the buns for
several minutes until they’re dry, mist them with hair spray (like Big Sexy Hair Get Layered Layering Hairspray),
undo the pins, and shake your hair out in all its rumpled glory.
RUMPLED WAVES
11. ALL-NATURAL CURLS
Getting these sexy, lush curls comes down
to your hair texture. Those with straight hair will need to wrap one-inch
sections around a three-quarter-inch curling iron, spritzing with firm-hold
hair spray along the way (in other words, see you in an hour or two). Those
born with these amazing curls can stretch them slightly by combing styling
cream—likeSuave Professionals Sleek Anti-Frizz Cream—through damp hair
and then blow-drying with the nozzle, suggests hairstylist Diego Da Silva. Use
your fingers to open and separate the curls until the hair is soft, dry, and
airy.
ALL-NATURAL CURLS
12. FAUX UNDERCUT
We don’t need to
explain how cool a faux undercut is. But here’s how to make one: Create a deep
side part, following the part all the way down to the nape of the neck. Clip
all the other hair out of the way. Brush the side with less hair back and
secure it very tightly with a clear elastic under the other section. (You can
also French-braid it, cornrowit,
twist it, or Bop It.) Now, unclip the other side and scrunch a handful of
strong-hold mousse (like Vidal Sasson Pro Series Extra Firm Hold Mousse)
into it from roots to ends. Blow-dry the hair (even though it’s dry) while
pulling the hair upward with a round brush for the most dramatic volume.
FAUX UNDERCUT
13. CLASSIC GAMINE
“The length really accentuates her
bone structure,” says McMillan, who’s been cutting Michelle Williams’s
hair for years. The sides and back are close to one inch long, but the top
layers, about six or seven inches, give texture—and make growing it out much,
much easier. Just know that you’ll need to see your stylist every four weeks
for maintenance before that happens.
CLASSIC GAMINE
14. PINUP-GIRL PIGTAILS
We know how annoying it is to read a hair
tutorial that asks you to curl your whole head before braiding it, but trust us
here. Wrapping it around a one-and-a-half-inch curling iron “is like using
a magic wand,” says hairstylist James Pecis. “It sets the foundation
for soft hair with bend and movement.” Once you finish, tease the hair at
the top and back of the head (roots to midlength) until it looks like cotton
candy. Tie the hair in two low pigtails, braid the tails, and secure them with
a second set of elastics. Then mist it all with hair spray (likeLiving Proof Flex
Shaping Hairspray).
PINUP-GIRL PIGTAILS
15. FAUX BANGS
For an instant change with zero
commitment (when does that happen?), try clip-in bangs. You’ll need a quality
piece made from real hair and your stylist to help you cut them and match the
color, if necessary. After parting the hair, tease the roots and spritz them
with hair spray, then slide the piece underneath and snap it in. “Feather
the bangs out over the forehead and brush your own hair over the top so they
look seamless,” says hairstylist Garren.
FAUX BANGS
16. UNDONE UPDO
We love absolutely
everything about this style. The undone texture (created by blow-drying the
hair with a small and medium round brush for a natural wave). The swoop (blown
out with a big round brush, then tucked behind the ear). And the knot (first
secured in a ponytail, then messily twisted around the base and pinned inch by
inch with Goody bobby pins).
UNDONE UPDO
17. BUBBLE BRAID
This is the ideal style
for when you buy a pack of hair ties (because God knows where they go after
that). Start by placing the first one at the nape of the neck. Then slide in
another one a few inches below that. Every time you slide a new elastic in,
hold the tail firmly with one hand and push the elastic up into the tail with
the other hand to create the bubble effect.
BUBBLE BRAID
18. MUTED HEADBAND
Muted, nude tones
hitfashion,nails, and
hair color this season. Another popular place for them? Headbands. Select a
nude or brown two-inch cotton band (choose one that is closest to your hair
color—Scünci has good, cheap ones). Push it past your forehead so it just
barely hides your hairline. Let your hair fall loosely behind it, or wrap it
into a ponytail or bun.
MUTED HEADBAND
19. SCHOOLGIRL HAIR
“It’s young,
cool, and imperfect,” says hairstylist Eugene Souleiman. It’s also
ridiculously easy. To get this airy, matte texture, Souleiman misted salt spray
through the hair (try Bumble and Bumble Surf Spray), then
swept a large piece across the forehead and slid in a visible black
bobby pin.
SCHOOLGIRL HAIR
20. RETRO WAVES
These “old
Hollywood meets ’90s-era Madonna” waves are all about shine, shine, shine.
At Chloe Grace
Moretz’s September 2014 Allure cover shoot, Garren
wrapped the hair at the crown in medium hot rollers for lift. Then he curled
the rest of the hair with a one-and-a-half-inch curling iron, wrapping it in
alternating directions so it didn’t fall into one wave pattern. He brushed the
hair slowly with a boar-bristle brush and smoothed over it all with a couple
drops of smoothing oil (like Redken Diamond Oil Shatterproof Shine).
RETRO WAVES
21. BRAIDED PRINCESS LEIA BUNS
These quirky Miu Miu buns are cooler than
George Lucas’s version, thanks to their glossy sheen. Work a shine-enhancing
gel, like Wella Pearl Styler,from
roots to ends, then make a strong side part. Divide the hair in half and create
tight pigtail braids from behind the ears to the ends, securing with two
elastics. Twist the two braids into buns at the nape, finishing with bobby
pins.
BRAIDED PRINCESS LEIA BUNS
22. OFF-DUTY BALLERINA BUN
“Diane [Von
Furstenberg]wanted a ballerina-inspired bun, but a ballerina in
rehearsal,” says Pita. He worked dry shampoo into the hair before tying it
in a ponytail at the back of the head. He back-combed the tail with a teasing
comb, then twisted it into a bun with bobby pins. He broke up the bun with his
fingers to create the messy, imperfect finish.
OFF-DUTY BALLERINA BUN
23. BOMBSHELL BLOWOUT
Blake Lively’s messy waves are “sexy,
wild, and almost furious,” says hairstylist Stephane Lancien. He started
by prepping her hair with mousse and rough-drying it. Once it was dry, he
wrapped random, face-framing layers around a large curling iron and messed them
up with his fingers to create the tousled texture.
BOMBSHELL BLOWOUT
24. OVERSIZE CROWN
A small, sparkly hair accessory is
perfectly cute and sweet. An over-the-top crown: totally badass. Hairstylist
Tommy Buckett suggests doing as little styling to your hair as possible.
“You want to let the headpiece speak for itself.” Jennifer Behr makes
great ones, or you can find more affordable versions on Etsy or at Urban
Outfitters.
OVERSIZE CROWN
25. MICRO BANGS
Micro bangs give instant sex-kitten
appeal and edge to any style. But they’re also a major commitment, so make sure
you’re ready for daily (sometimes twice-daily) styling. Still in? Ask your
stylist for a soft arc that falls two inches from the hairline.
MICRO BANGS
26. FISHTAIL BUN
Once you’ve mastered thefishtail braid,it’s
time for the fishtail bun. Pull your hair into a low ponytail and fishtail it
to the ends. Wrap the fishtail around the back of your head and use U-shaped
pins to secure it, catching both the hair against the back of your head and the
hair in the braid with each pin. Tuck the ends into the braid and finish with
hair spray (we lovePantene Pro-V Stylers Anti-Humidity Hairspray Maximum Hold).
FISHTAIL BUN
27. CORNROWS
You don’t want to be stuck with your
hands above your head searching for an elastic (trust us, been there). So first
lay out a sectioning comb, five duckbill clips, and five small, plastic
elastics. Then, starting at the middle of your hairline, create three to five
clean, one-inch-wide sections with a comb and clip each out of the way. Make
sure the center section is perfect. “That’s where the eye goes
first,” says Pecis. Start French-braiding the center section, crossing the
hairs under rather than over, which is what makes the braid pop out. Braid
tightly until you reach the crown, secure the ends with a small elastic, and
give your arms a quick break before moving on to the remaining four sections.
CORN ROWS
28. SEXY PIGTAILS
Here’s why your pigtails will look
freakin’ hot—and not like the bouncy, playground version: You will create a
messy, off-center part, you will tease the hair at the crown first, and you
will secure the hair just under the ears so it falls neatly on your shoulders.
This looks best on those with shoulder-length hair.
SEXY PIGTAILS
29. WOVEN PONYTAIL
Make sure your
roommate is home when you start this, because it takes two to complete this
intricate ponytail (but it will be so worth it). Blow-dry and flatiron your
hair straight. Section the top half of hair from temple to temple and make a
middle part, crisscrossing each side tightly over each other. Secure each piece
behind the ears with a small elastic (this is where you need two people so the
sections don’t droop). Repeat the process using sections from the side of the
head and crossing them over the nape. Tie the hair into a low ponytail and wrap
a section of hair around the elastic before spraying it with hair spray (like Dove Style+Care Strength & Shine Flexible Hold
Hairspray
WOVEN PONYTAIL
30. UNDONE BRAID
The low placement
of this braid isn’t just effortlessly beautiful, it also creates two styles in
one (faux lob in the front, braid in the back). Mist a texturizing spray, like Kevin Murphy Hair Resort Spray,all
over dry hair. Then start braiding from midlength to the ends (the braid will
drop slightly from where you start it). Secure with an elastic after two or
three rotations and wrap a piece hair around it and pin for a polished finish.
UNDONE BRAID
31. BARDOT BLOWOUT
This voluminous
blowout is missing its signature step: back-combing. “Teasing turns it
retro,” says Pita. Instead he prepped the hair with volumizer (like Kérastase Lift Vertige), rough-dried
it, curled it with a large-barrel curling iron for an airy effect, and worked
dry shampoo (like Klorane Gentle Dry Shampoo with Oat Milk)
into the roots while roughing them up with his fingers. “The dry shampoo
makes the hair stay up,” Pita says. Plus, it’s not a pain in the B to
brush it out in the morning.
BARDOT BLOWOUT
32. MODERN CRIMPS
Crimping is back, but don’t be scared.
This time it’s subtle, random, and surprisingly refined. For a ponytail like
this one, take a mini crimper to three or four random sections of your hair
(roots to ends) before delicately smoothing it into a low ponytail. You can
also leave your hair loose—just be sure to spray it with some salt spray (likeO&M Surf Bomb Sea
Salt Spray) to keep the texture cool, not considered.
MODERN CRIMPS
33. LOOPED-THROUGH BUN
Two is better than
one in the case of this sporty headband look. Start with a one-inch headband of
any color, then layer a double-strand black headband on top of it (Scünci makes
them). Tie your hair in a ponytail, then loop the tail through the black headband.
That makes the hair follow the line of the neck so it looks more elegant, says
hairstylist Odile Gilbert.
LOOPED-THROUGH BUN
34. HALF-UP LOOP
When you pull your
hair half-up, please remember two things. 1) Never pull back literally half of
your hair, or the hair below will look thin and shrimpy. A better ratio is
70/30. 2) If you have a round Céline barrette, by all means use it. If you
don’t, Mrs President & Co.makes an amazing dupe (now only
available in silver).
HALF-UP LOOP
35. RIBBON BRAID
Don’t try to make this
perfect, or you’ll lose all the fun. Section off the hair on top of your head
in a horseshoe shape (the base of the horseshoe is at the crown). Clip the hair
from the sides and back out of the way. Gather all the hair from the front and
tie a long black ribbon (twice as long as your hair) around the base. Separate
the hair into three parts and place the ribbon in the two outside sections.
Every few rotations, tie the ribbon in a knot and begin braiding crazily again.
Use bobby pins the same color as your hair to push any saggy pieces into your
braid and enhance the Mohawk shape.
Your Wedding will be one of the
most important events of your life. You will want every aspect of it to be
wonderful and you yourself, will want to look absolutely beautiful at all
times. Deciding on a hairstyle for this special ceremony is important. There
are so many gorgeous wedding hairstyles for long hair to choose from, you need
to take your time and pick one that will be perfect for you. Wedding hairstyles
for long hair includes western designs, classic updos or long, loose waves.
Choose a hairdo that will bring out your natural beauty and make you look
stunning. You will want a style that will hold in place all day for all those
pictures and videos, too.
Wedding hairstyles for long hair will
determine how you decorate your hair and use a veil or tiara. It can also help
you to show off the jewelry you will wear. You may have to choose a hairstyle
that will compliment your custom or tradition. Since there are lots of options,
planning ahead can help avoid getting overwhelmed and last minute surprise
glitches. If it is at all possible you may want to try your chosen hairstyle
out in advance to completely perfect your look and to make sure you are totally
happy with the results before your big day arrives
Upto hairstyles for long hair can
be done in a variety of ways depending on what you desire. Soft curls carefully
pinned in place and ornamented to match your wedding dress can give a romantic
feeling and look to your hair. Wearing your hair up will help to keep you cool
if the weather is hot. This look inspires confidence and elegance.
Multi-Braided Bun
Hairstyles
As this multi-braided
bun shows there are endless possibilities for decorating wedding hairstyles for
long hair when it is worn in an updo. Flowers, gems, pearls, and ornaments are
just a few things you can add to your beautiful hairdo. Updo hairstyles are
also perfect for wearing a tiara as the tiara emphasizes your updo bringing out
the beauty of your hair. You will want your wedding to be a memorable occasion
and your hairstyle will be part of those wonderful memories
Updo hairstyles for long hair are
a timeless, classic look that suits anyone of any age and are great for any
formal occasion, not just a wedding. Your updo can be done using braiding or
wrapping and pinning in place or any combination therein. However you dream of
having your hair for this important event is possible.
Back Bun Hairstyles
This back bun updo is done with a combination of
straight wrapped hair mixed with curls and braids. You can wear an updo
hairstyle as plain and simple or as fancy as you would like. You will want your
hair to look radiantly beautiful for this important event, so caring for your
long hair is essential. Be sure to keep split ends and tangles to a minimum by
trimming your hair if it is needed. You will want to keep the ends of your hair
well conditioned to prevent splitting and tangling. Be gentle when washing your
hair to avoid damaging it and stay away from hot water as this can dry out your
hair striping it of its natural oils. Always use conditioner on your hair after
washing it especially on the ends to keep it healthy. It is best to let your
hair dry on its own without using any sort of blow dryer or heat to dry it and
try to avoid rubbing your hair dry with a towel. Take care when brushing or
combing out your hair. Be gentle. Try to use a brush with natural bristles or
if you are using a comb, make it a wide toothed comb for the best results.
South-Indian Wedding Hair Styles
Bridal hairstyles for long hair
include traditional looks that are beautifully adorned. A simple, single braid
worn down your back decorated with Jasmine flowers and buds not only looks
wonderful, but smells terrific also. Jasmine is a traditional flower worn by
the bride and sometimes the groom. The Jasmine buds have a stronger scent than
the flowers, so keep this in mind if you plan to use this fragrant flower
Wedding hairstyles for long hair
usually have flowers inter weaved. You may want your entire braid to be covered
with flowers and buds with your braid being completely covered. If you hair is
not as long as you would like you can faux extend the length this way by
trialing the flowers down as long as you desire. Wearing red is a traditional
bridal color that signifies happiness, so it is natural to have your hair
decorated with red flowers or ornaments. Red is also the color of life, love
and passion and the bride wears this color to reflect this as she embarks on
her journey through her new life with her husband.
Jeweled Indian Bridal Hairstyle
Wedding hairstyles for long hair
include having a braid done to one side and worn over your shoulder rather than
straight down the middle of your back. If you have luxurious, healthy hair, why
not show it off this way? You can leave the braid plain without too many
ornaments for a more understated look, but still have the crown of your head
elegantly decorated. This will bring the focus of attention more to your
attractive face.
Side Swept Hairstyle
You may wish to have your
hairstyle a little less formal by wearing it long and loose. This Side Swept
hairstyle is the perfect partner to compliment the beautiful veil in the photo
above. Having long, flowing, wavy hair can look stunning with your wedding
dress. Wedding hairstyles for long hair don’t have to be cumbersome or
restrictive, but can be easy and carefree if that better suits your
personality. This style of hair can still be adorned with decorations or veils
if you wish. You can wear your hair pinned over to one side if you don’t want
it all unbound. Ultimately, the hairstyle for your wedding is your choice and
you will want to be comfortable and relaxed without having to continually fuss
over your hairdo. You will want a style that reflects your personality and
makes you look radiant.
Loose Wavy Hairstyle
Casual, long, loose wavy hair
style can be the perfect choice for your long hair depending on your wedding
style. This can be a no fuss solution for your hairstyle and relieve any stress
of having to do something more intricate with your locks. You will have so many
details to arrange for this lavish affair, that you may want to make things a
little easier by having a simple hairstyle. This way of wearing your hair can
be just as stunning as a more time-consuming hairdo. You want to enjoy this
special occasion and have fun eating and dancing and making the most of your
wedding. The less stress or worry you have the better. Having a simple hairstyle
can help keep your mind off your appearance and focused on the festivities
Wedding hairstyles for long hair
can be as formal or casual as you wish. Having your hair loose doesn’t have to
be completely informal as you can pin up parts of your hair to create different
looks and give it more of a stylized feeling. Complete this look with ornaments
and veils
Here we see another example of
long, loose wavy hair style that has been pinned back from the front done in a
way to add more waves to the top of her hair. The western bride wants to look
her best when she walks down the aisle on her father’s arm towards her future
husband and is seen in her wedding gown for the first time by all the guests.
She chooses her clothes and hairstyle carefully to reflect her taste and style
hoping to have a perfect wedding day.
Open Straight Hair Style
You
want your hair on your wedding day to make you look your most beautiful, so try
different styles to find the one that will compliment you the best. With such a
vast array of wedding hairstyles for long hair, you may need to try a few
before finding the right one. You are going to want to look beautiful for your
new husband and your family and friends on this most important day, so don’t
leave your hairstyle to chance. Be sure you will be happy with the choice you
make
Long Hairstyle With Flowers
Decorating
your hair with a floral wreath is a simple yet pretty way to wear your hair for
your wedding and looks amazing with your hair loose and flowing down. This
style will free up lots of time that can be used for celebrating rather than
being spent on doing a more elaborate hairstyle.
Cone Shaped Wedding Hairstyles for Long
Wearing white is a western tradition for brides.
White signifies purity and wealth as this color is difficult to keep clean. In
modern times, the western bride’s white gown will only ever be worn once,
another way to show off how wealthy she is. The addition of white flowers,
pearls or other ornaments in her hair is common for brides. There are many
wedding hairstyles for long hair to choose from and these are popular in the
west, too. Wearing your hair down and loose is a feminine, attractive way to
show off your beautiful hair.
Loose Back Bun Hairstyles
Western wedding updo hairstyles
can be done with a casual flair to add softness to your look helping to make
this normally formal design more relaxed. This photo shows a lovely, loose back
bun which gives an air of romance. Having your hair up in a bun or other updo
is a perfect style to go with a sleeveless dress and accentuate your shoulders.
In the west, June is considered the lucky month for the bride for her wedding
to take place.
Fishtail braid Hairstyle with Tiara
A fishtail braid or other types
of braids are popular wedding hairstyles for long hair. French braids are very
common for a bride and her bridesmaids to wear on the wedding day. There are
many different types of wedding ceremonies in the west usually depending on the
religion(s) involved or the wishes of the couple getting married. For instance,
Celtic style weddings are growing in popularity in the British Isles and North
America. With the different types of ceremonies comes numerous wedding
hairstyles for long hair. The possibilities seem endless.
Formal Wrap Bun Hairstyle
A
formal wrap around bun hair style updo is another option for this special
occasion. If you want your wedding to be a serious, stately ceremony this would
be a perfect hairstyle. Wedding updo hairstyles give you many different looks
to choose from and we have only seen a few here
Cascading Braid Hairstyle
Bridal
hairstyles for long hair can be as beautiful and romantic as you like. Here we
see a graceful cascading braid adorned with pink roses. This occasion is a
wonderful way to let your naturally beautiful long hair be showcased. Along
with the traditional white the western bride usually chooses a couple of other
colours to be used for her wedding decorations and in her bouquet. The groom
and groomsmen usually wear one or more of these colours for their ties and
cummberbuns and/or boutineers as well.
Loose Side Braided Hairstyle
This photo shows a chunky loose
side braid adorned with a wreath of flowers. The bride may wear flowers, gems,
a tiara or veil in or over her hair for the wedding ceremony. She may choose a
hairstyle that will go with her dress and what she plans to wear on her head or
she may choose the hairstyle first and then plan her ensemble later to best
suit her hair. The bride’s personality shines through on her wedding day,
whether it is formal or casual, fun or serious. It is a day for the newlywed
couple to shine


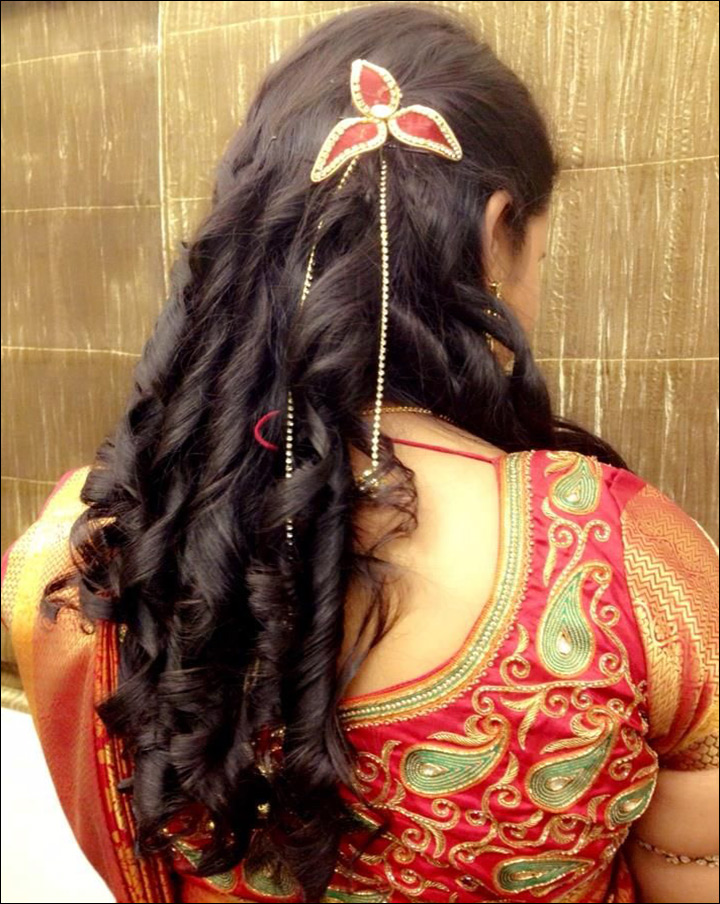


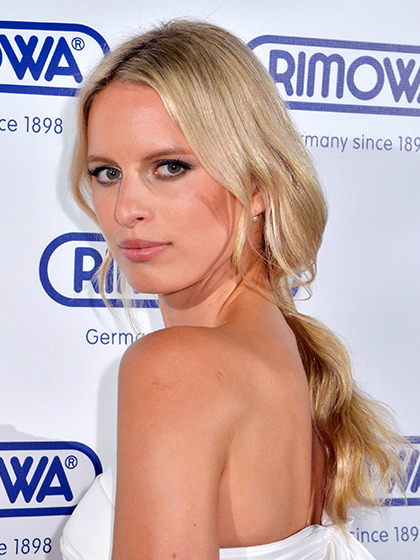
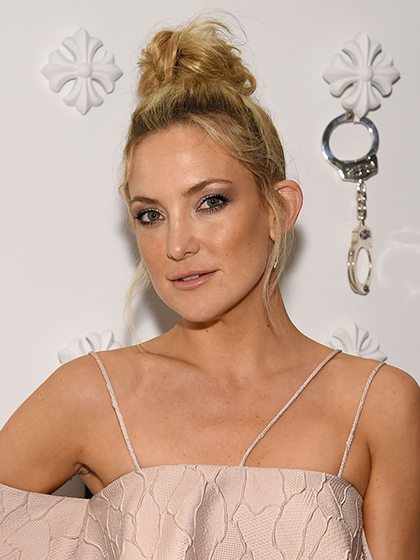


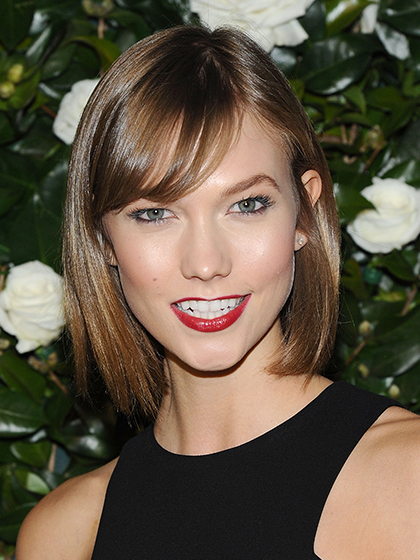
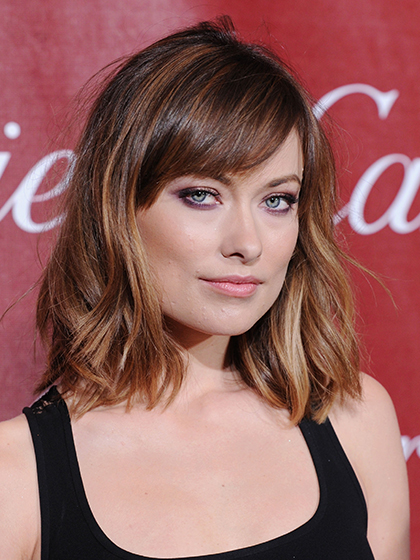
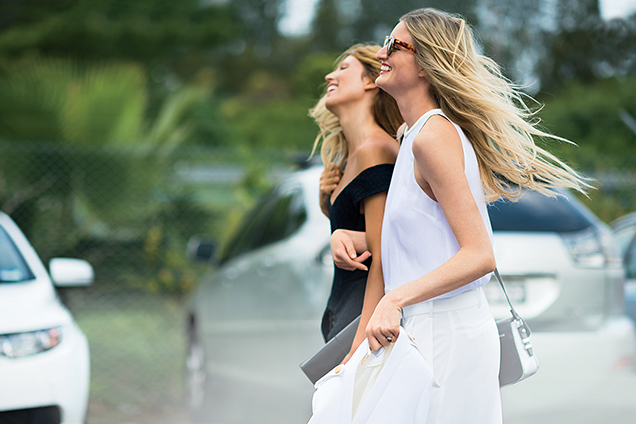
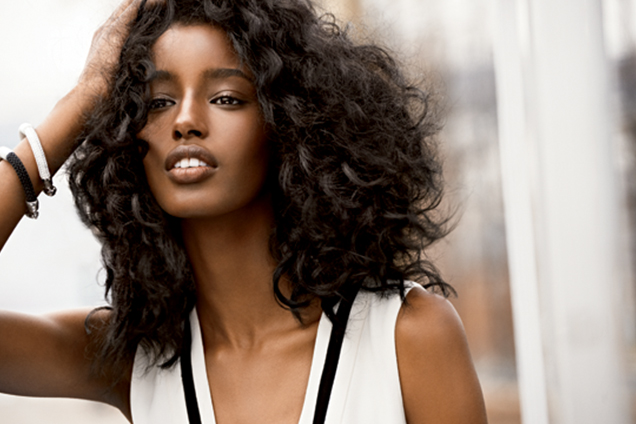

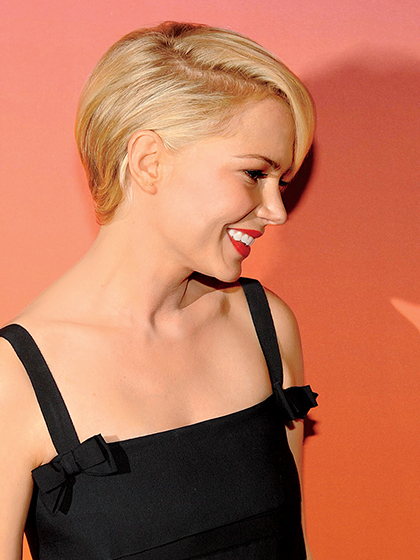


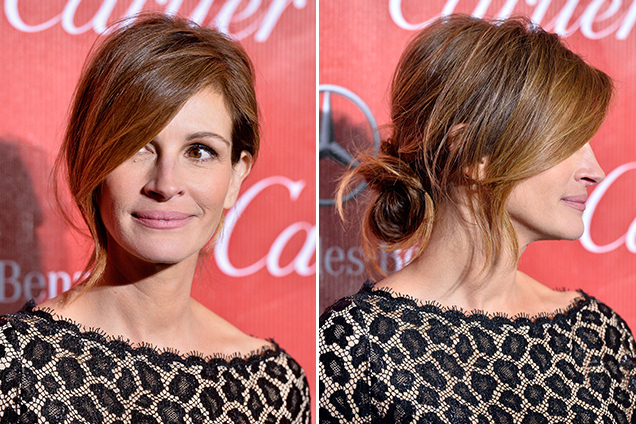


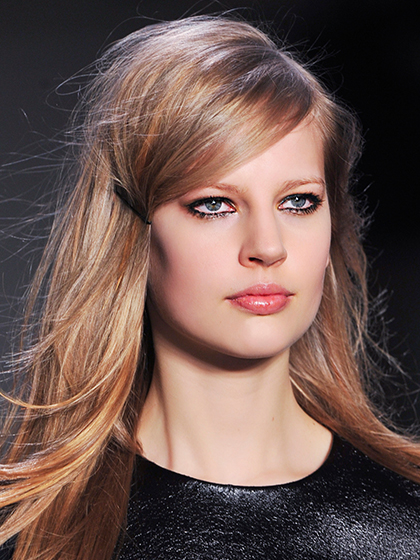


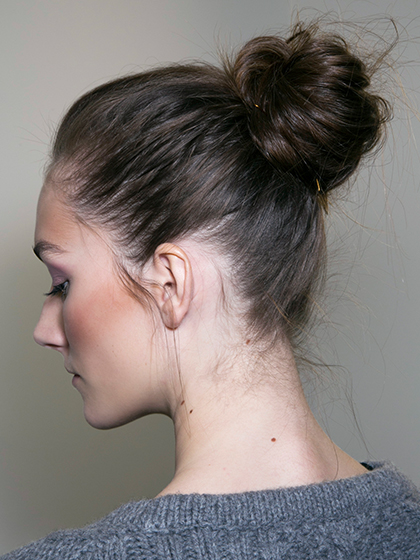


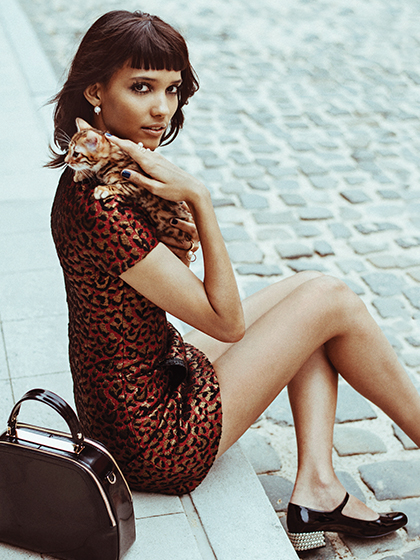
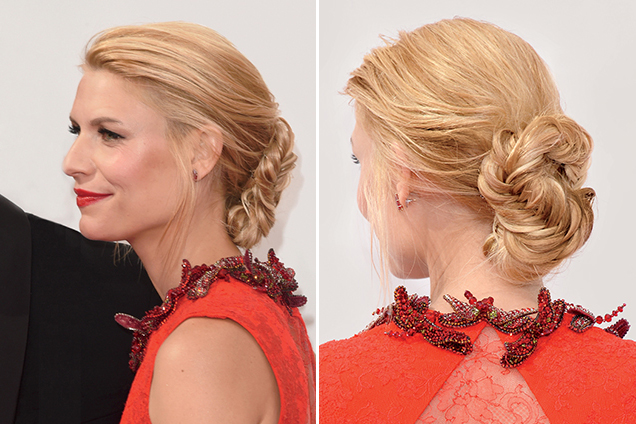
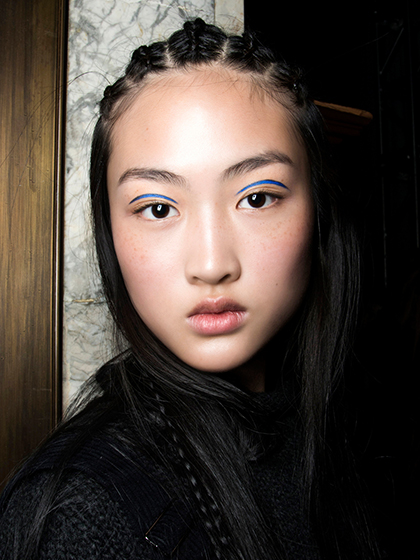


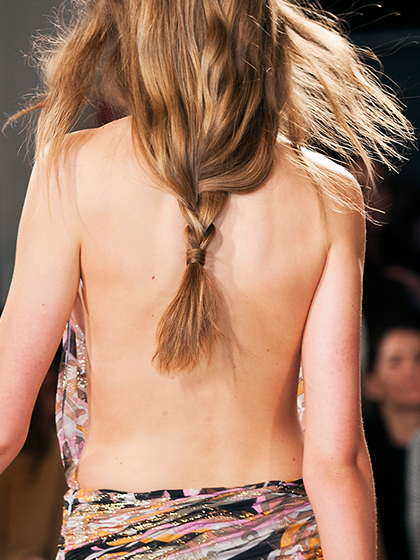

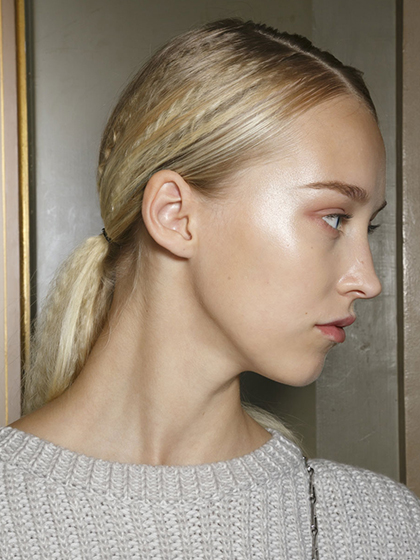


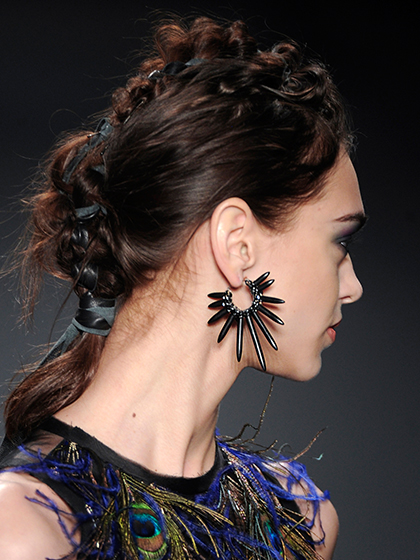


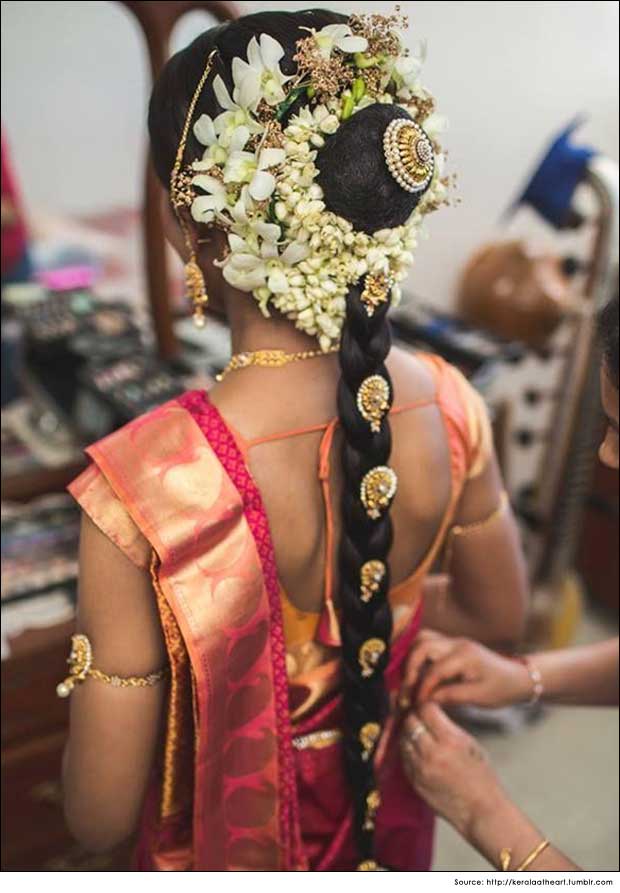
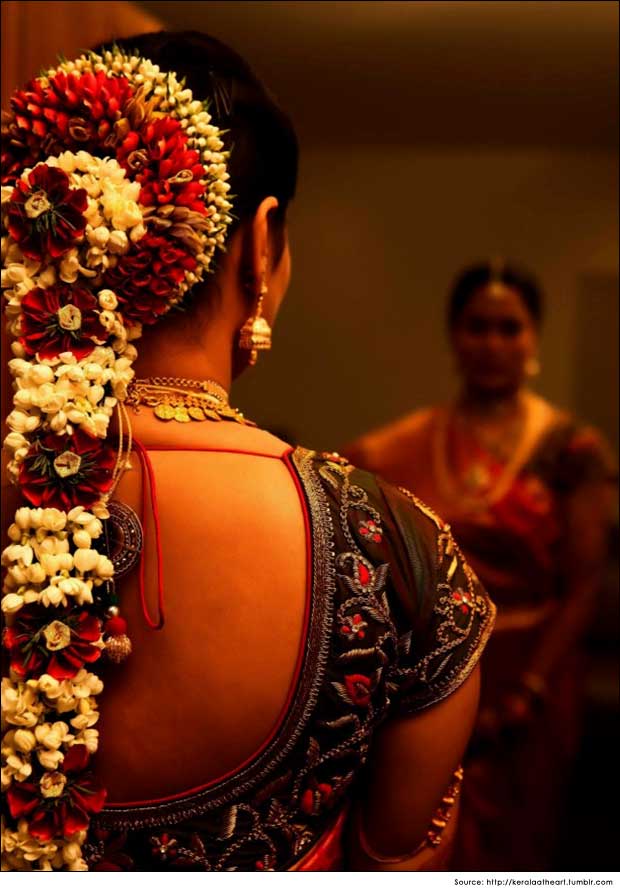
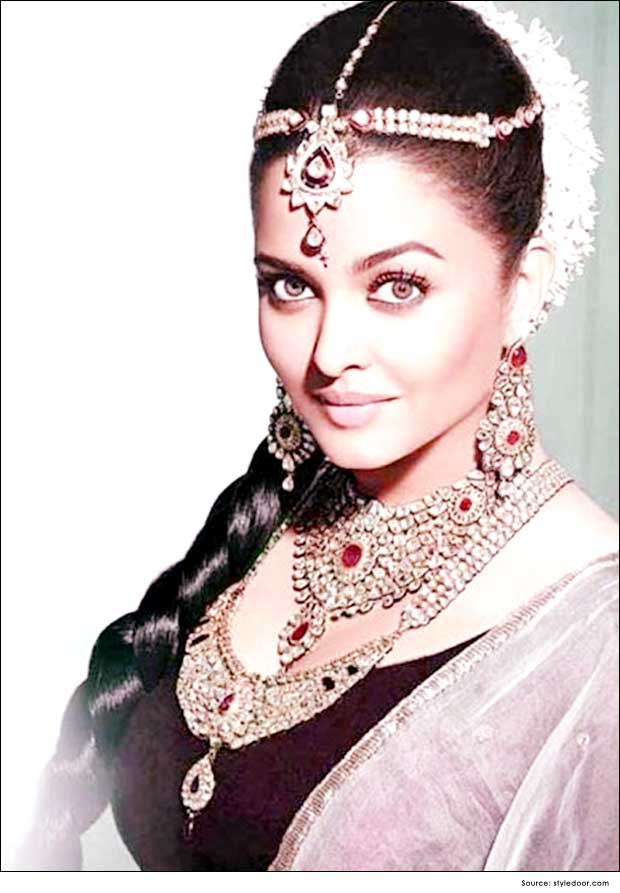
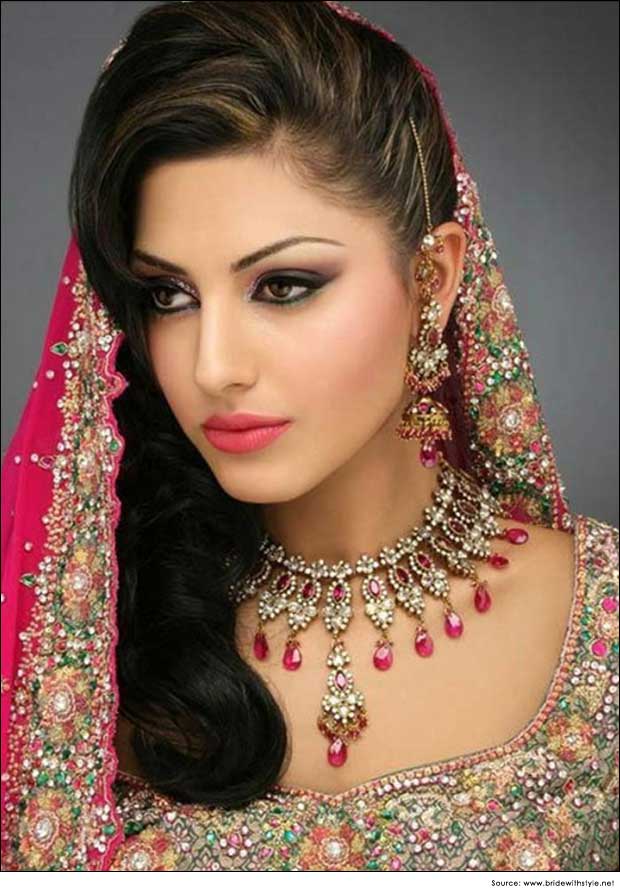
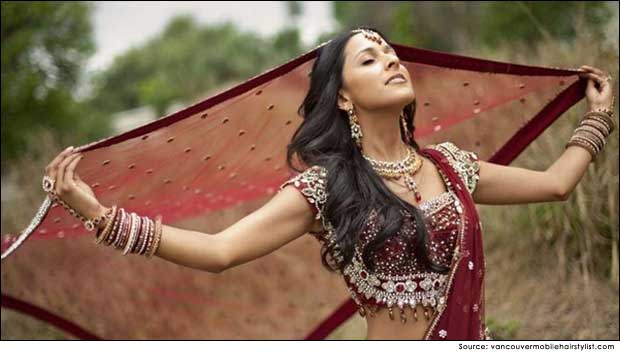
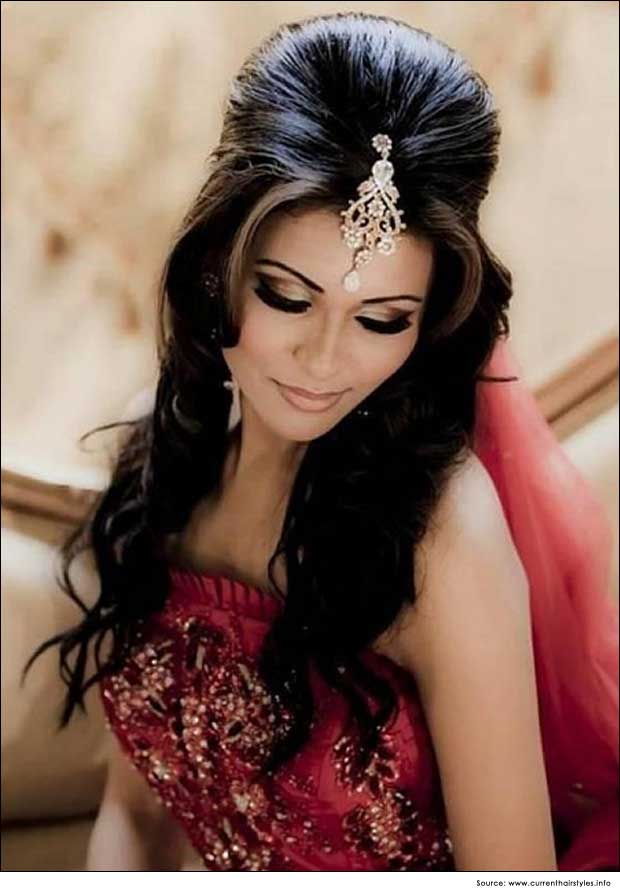

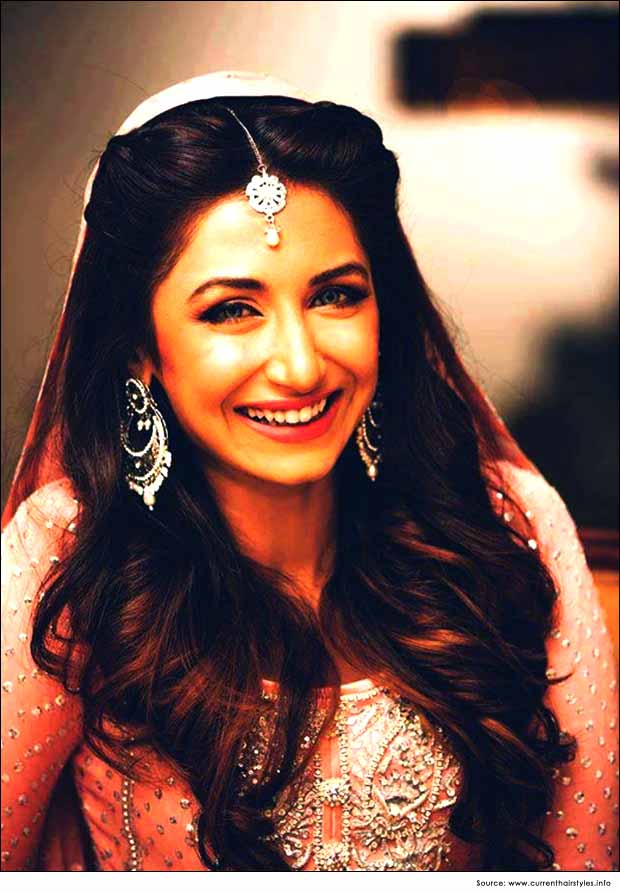
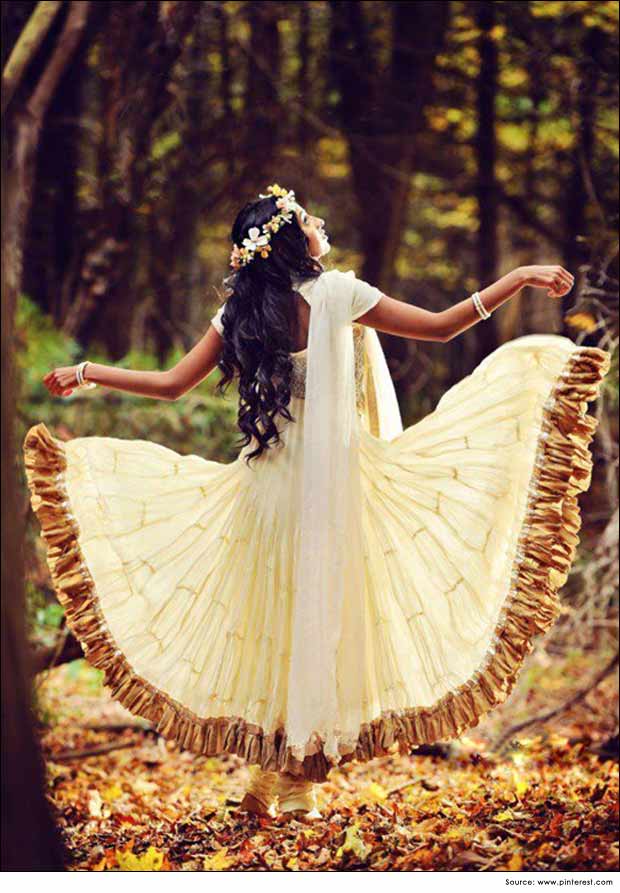
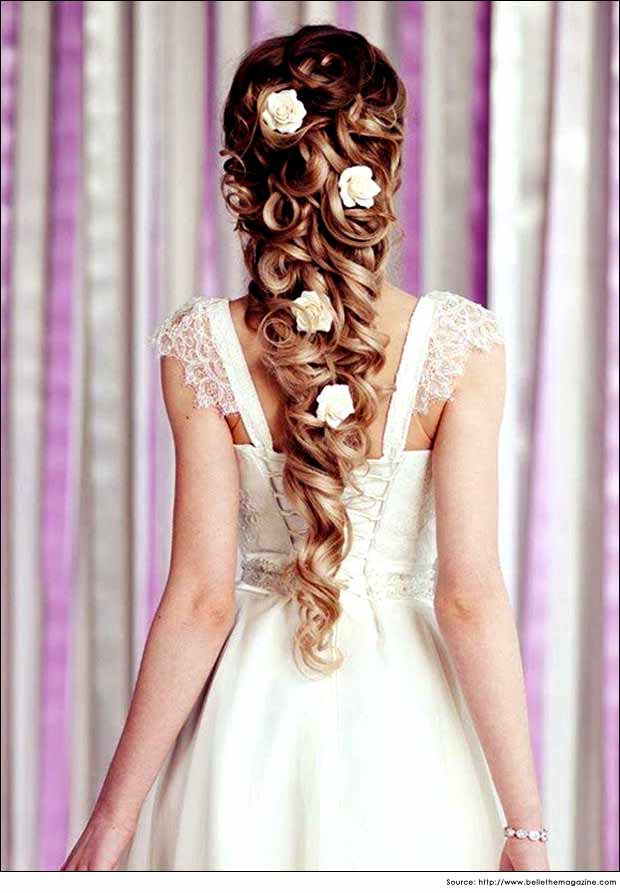

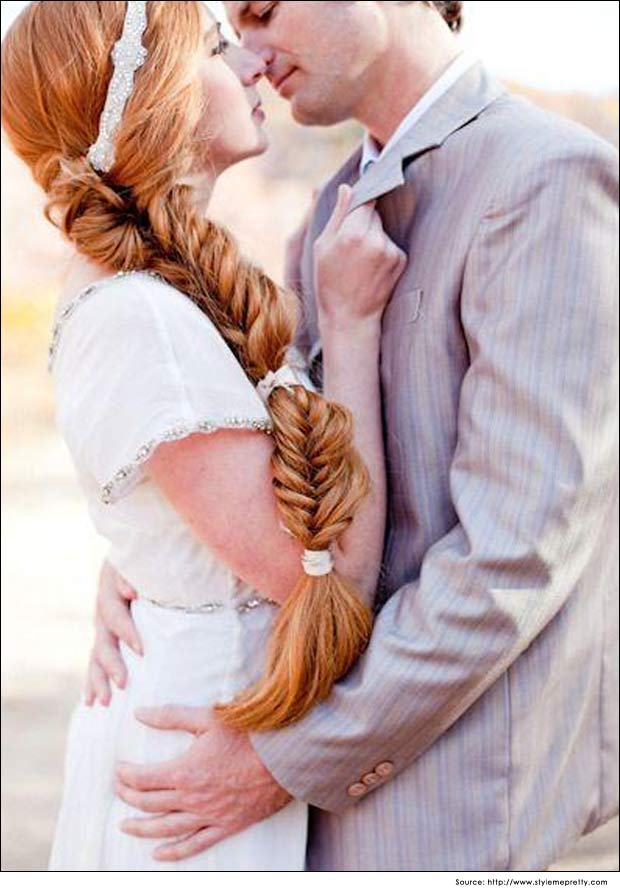


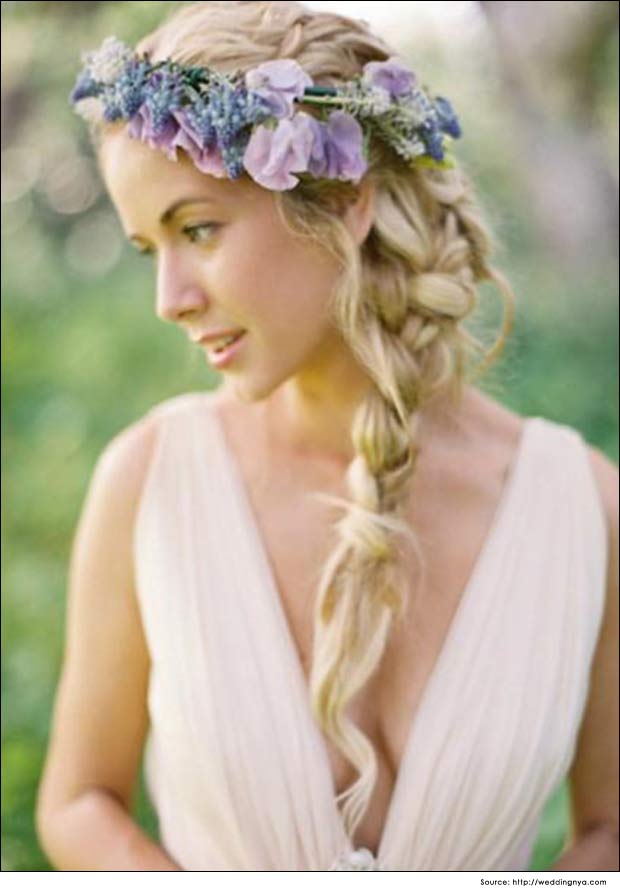